Saniderm Peel Day-by-Day: What's Normal, What's Not
A day-by-day breakdown of what happens under a Saniderm bandage, when to remove it, and why the gunk underneath is supposed to look like that.
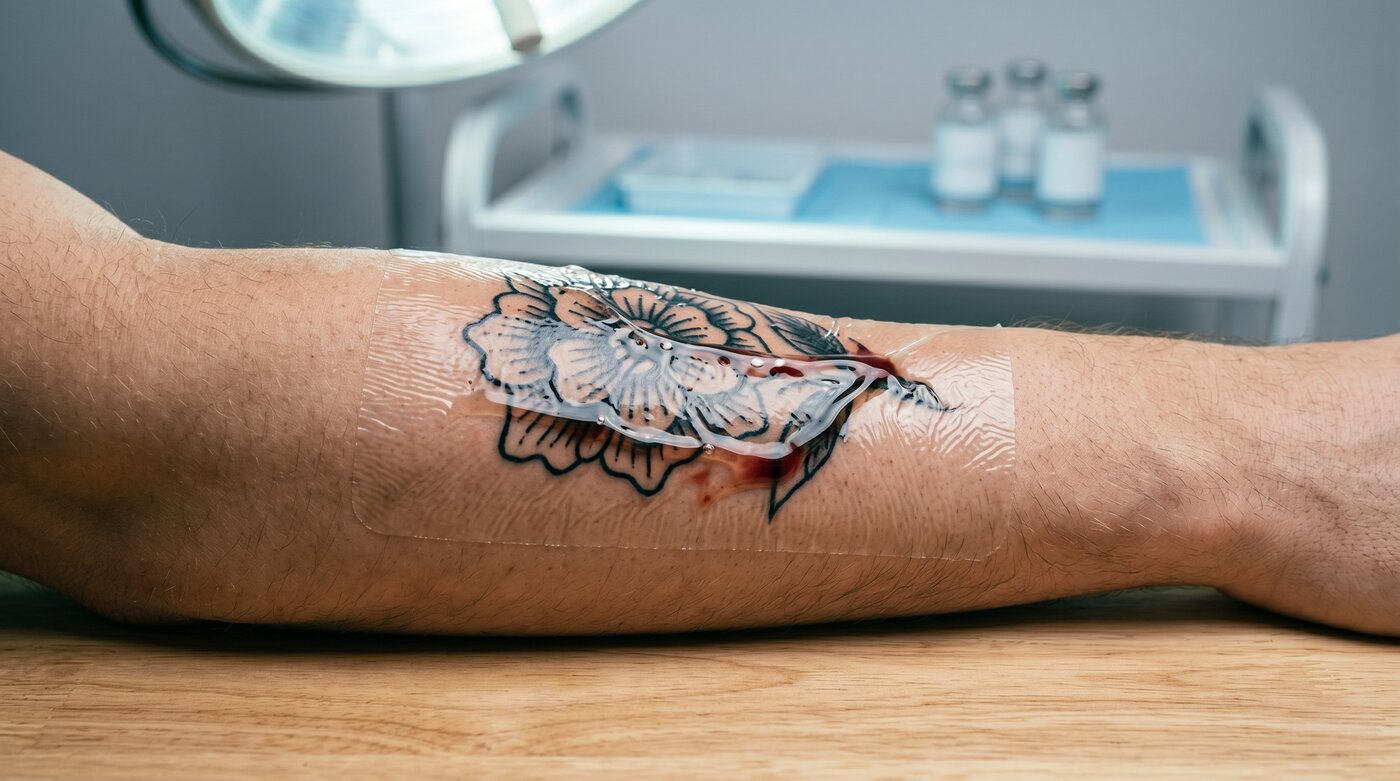
The first time you peek under a Saniderm bandage and see ink-streaked plasma sloshing around, you’ll think you’re in trouble. You’re not. That’s the bandage doing exactly what it’s supposed to do. Here’s what’s happening under there, day by day, and the actual signs that something is off.
How second-skin works (the 30-second version)
Saniderm is a polyurethane film with an acrylic adhesive. It’s breathable to oxygen and water vapor, but waterproof to liquid. Plasma, lymph, and excess ink seep out of the fresh wound and pool under the film. The seal traps that fluid against the skin, which keeps the surface moist and prevents the thick scabs you’d otherwise get from air-drying. Moist healing is faster, less itchy, and produces less ink loss than dry-scab healing.
That’s the whole mechanism. The brown-red soup under the bandage is plasma + lymph + sloughed surface cells + a small amount of ink. It is not infection.
Day 0: The first wrap
Your artist applies the first piece of Saniderm (or sometimes Tegaderm — see our breakdown of the two) right after wiping the tattoo down. The bandage extends 1–2 inches past the edge of the tattoo on all sides — that border is what holds the seal.
What’s normal in the first few hours:
- Plasma starts pooling underneath almost immediately
- The fluid is yellow-pink at first, going darker as ink mixes in
- The skin under the seal feels warm
- Some swelling, especially on hands, feet, and ankles where gravity works against you
What’s not normal: the bandage edge lifting on day 0. If a corner peels, do not push it back down with a fingernail. Reseal it with a piece of medical tape across the lifted edge. If it’s a major lift (more than an inch), strip the bandage carefully and either replace it with fresh Saniderm or switch to a traditional wash-and-balm protocol.
Day 1: Maximum gunk
This is the day the fluid pool looks the worst. Most people panic at this stage and either rip the bandage off prematurely or send a 3 a.m. text to their artist. Don’t do either.
Normal:
- A visible pool of brown, red, or amber fluid under the film
- The tattoo itself looks like it’s “smudged” or smeared inside the bandage — it isn’t
- Mild itching as the seal warms
- The bandage is taut over the swelling
If the pool gets so large that it’s pressing against the seal edge and threatening to break it, you can drain it: wash your hands, wipe the seal area with a clean alcohol prep pad, and use a sterile needle (the kind diabetics use, not a sewing needle) to make a single small puncture at the lowest point of the pool. Press the fluid out gently, then cover the puncture with a small piece of medical tape or a fresh patch of Saniderm.
Most people don’t need to drain. The pool reabsorbs over days 2–3 as the wound starts to close.
Day 2: Itch starts, fluid darkens
The pool gets less liquidy and more gel-like. The color shifts from red/amber to brown. This is dried plasma mixing with what’s still wet. The tattoo underneath starts looking more defined again as the surface tension of the fluid changes.
Normal:
- Itching ramps up
- Fluid pool is smaller than yesterday
- The bandage edges may show some adhesive yellowing
- Mild redness extending past the tattoo (within ~1 inch of the edge)
What’s not normal:
- Red streaks radiating outward from the tattoo (lymphangitis — go to urgent care)
- Pus-like white-yellow fluid (different from clear/amber plasma)
- Fever or chills
- Increasing pain rather than decreasing pain
Real infection is uncommon with proper aftercare and a clean shop, but it’s medical and not something to “wait out.” If something feels wrong, see a doctor — not your artist.
Day 3: First bandage decision
Most artists tell you to wear the first piece for 24 hours minimum and up to 5 days. The sweet spot is 3–4 days. Beyond that, the seal often starts giving up on its own anyway.
Removing the first bandage:
- Do it in the shower with lukewarm water running over the edge
- Stretch the film flat against the skin, parallel to the surface, rather than pulling it straight up. Pulling up tears the wound. Pulling sideways releases the adhesive.
- Take your time — 3–5 minutes of slow stretching beats one painful yank
- The film comes off in long pieces; the gunk underneath rinses away with the water
Underneath, you’ll see a tattoo that looks oddly clean and shiny. No scabs, no peeling yet, just slightly raised skin and the pigment looking a little muted compared to day 0. This is correct.
Day 3–5: The second bandage decision
Some artists send you home with two pieces: the one you remove on day 3 and a second one to wear days 3–6 or 3–7. Others tell you to switch to wash-and-balm at this point. Both are valid. The second-bandage protocol produces less visible peeling; the wash-and-balm protocol gives you more control and is what most older-school artists recommend.
If you’re applying a second piece yourself:
- Wash the tattoo with fragrance-free soap and pat dry with a clean paper towel
- Wait 5 minutes for the skin to fully dry — moisture trapped under the new film causes adhesion failure
- Cut the new piece with a 1-inch border on all sides
- Apply with the backing peeled in one continuous motion, pressing from the center outward to push out air
- Do not stretch the film tight — it should rest flat, not be under tension
If you’re switching to wash-and-balm:
- Wash 2–3x daily with fragrance-free soap
- Apply a very thin layer of Mad Rabbit balm or whatever balm you and your artist agreed on
- The tattoo should look faintly shiny, not greasy
Day 5–7: Second bandage off, peeling begins
Whether you wore one piece or two, you’re now in normal aftercare territory. The skin will start to flake. This is dead epidermis sloughing off — not the ink. The ink is in the dermis, which is below the layer that’s peeling.
Normal:
- Thin, papery flakes that look like they have ink in them (they do — but it’s surface ink, not the saturation)
- The tattoo looks “patchy” because the dead skin is opaque against the still-healed sections
- Itching peaks around days 7–10
For a complete picture of the next phase, see our tattoo healing stages guide.
Day 7–14: Cloudy phase
The peeling finishes around day 10–14. Underneath, the tattoo looks dull or “waxy” — that’s the regenerating epidermis still being slightly opaque. Final saturation isn’t visible until weeks 3–4.
Resist the urge to assess the tattoo at this stage. It is not done.
When the bandage isn’t doing its job
Reasons to remove Saniderm early and switch to wash-and-balm:
- The seal broke and you can’t reseal it. Once the seal is compromised for more than a few hours, bacterial risk goes up. Strip it.
- Persistent burning or itching that’s worse, not better. Some people are allergic to the acrylic adhesive itself (not common, but real). If the skin under the bandage edge is inflamed beyond what the tattoo would explain, the bandage is the problem.
- A rash with small bumps under the seal. Contact dermatitis from the adhesive.
- The fluid pool is opaque white-yellow and smells. That’s pus, not plasma. Doctor.
In every other case, leave it on. The visual ugliness of the gunk pool is not a reason to remove a bandage that is doing its job.
What goes on after
Once the second-skin phase is done, you’re in standard aftercare for the next 4 weeks. See our aftercare guide for the balm-and-soap routine. Once you’re past peeling, switch to plain moisturizer, and once you’re fully healed, sunscreen becomes the most important variable for long-term saturation.
The short version
| Day | Normal | Not normal |
|---|---|---|
| 0 | Plasma pool starts forming | Bandage lifting at edges |
| 1 | Pool darkens, max gunk | Bandage breaks, fever, red streaks |
| 2 | Pool starts shrinking, itching | Pus, increasing pain |
| 3 | Remove first bandage | Skin under bandage rashy/blistered |
| 3–5 | Second bandage or wash-and-balm | Persistent burning at edges |
| 5–7 | Peeling begins | Pus, fever, hard hot swelling |
| 7–14 | Cloudy/waxy phase | None of the above resolved |
The goal of Saniderm is to make days 0–7 boring. If yours is going as described above, you’re fine. If something on the “not normal” list is happening, deal with it — your artist for application questions, a doctor for medical questions.
Adhesive Bandage Roll (4" × 8 yd)
Affiliate link · We earn a commission at no extra cost to you
Check price on Amazon →
Transparent Film Dressing Roll (4" × 11 yd)
Affiliate link · We earn a commission at no extra cost to you
Check price on Amazon →
Tattoo Balm
Affiliate link · We earn a commission at no extra cost to you
Check price on Amazon →